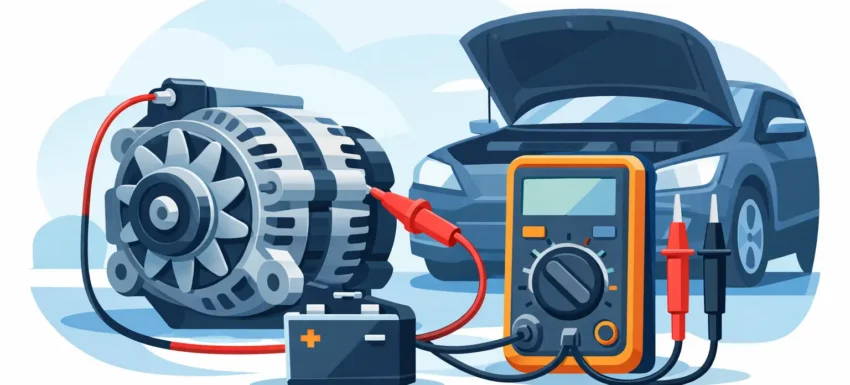
A battery warning light that flickers at idle, dim headlamps in traffic, or a van that struggles to restart after a short stop usually points in one direction – the charging system. If you want to know how to check alternator output properly, you do not need to guess and you do not need to throw parts at the vehicle. You need a methodical voltage test, a decent meter, and a clear idea of what the results actually mean.
For garages, mobile technicians, and capable DIY owners, this is one of the quickest tests you can carry out to separate a weak battery from a charging fault. It is also a test that gets misread all the time. A number on a screen means nothing unless the battery condition, electrical load, and engine speed are taken into account.
What alternator output should look like
On most 12V vehicles, alternator charging voltage with the engine running will usually sit somewhere around 13.8V to 14.7V. That is the normal working window, but it is not a fixed rule for every vehicle. Some smart charging systems vary output depending on battery state, engine load, temperature, and ECU strategy, so modern cars can dip below that figure at times and still be working as designed.
That is why context matters. An older vehicle with a conventional charging system should usually show a stable charging voltage soon after start-up. A newer vehicle with intelligent charging may hold back output, then raise it under braking or other operating conditions. If you ignore that difference, it is easy to condemn a good alternator.
How to check alternator output with a multimeter
The most direct way to test it is with a digital multimeter across the battery terminals. This gives you charging voltage, which is the starting point for any alternator assessment.
Begin with the engine off. Set the meter to DC volts and place the red probe on the battery positive terminal and the black probe on the negative terminal. A healthy, rested battery will usually read about 12.6V. If it is down near 12.2V or lower, the battery is partly discharged. That does not automatically mean the alternator is faulty, but it does affect what happens next.
Start the engine and check the reading again at idle. In many cases, the voltage should rise from the engine-off figure to somewhere in the charging range. If you still see battery voltage only, such as 12.2V to 12.6V with the engine running, the alternator may not be charging at all.
Next, raise the engine speed to roughly 1,500 to 2,000rpm and watch the meter. On a conventional system, the voltage should remain steady and normally stay below about 14.8V. If it climbs excessively, the regulator may be overcharging. If it drops away or fluctuates badly, the alternator may be weak, the belt may be slipping, or the electrical connections may be poor.
Then switch on electrical loads. Headlamps, heated rear window, blower motor and heated seats, if fitted, are useful here. The charging system should maintain a sensible voltage under load. A small drop is normal. A heavy drop into the low 12V range suggests the alternator cannot keep up, or current is being lost through bad connections.
Before blaming the alternator
A charging test is only as good as the battery and connections behind it. Corroded terminals, a poor engine earth, or a battery with an internal fault can all distort the results. If the battery is heavily discharged, the alternator may work hard immediately after start-up and the voltage may behave differently for a short period.
Check the battery terminals are tight and clean. Inspect the main alternator output cable and the earth path between engine, body, and battery. On belt-driven systems, make sure the auxiliary belt is in good condition and properly tensioned. A glazed or slipping belt can reduce alternator performance, especially under load.
This is also where proper diagnostic equipment saves time. Voltage is one piece of the puzzle. Battery health, fault codes, and live data can confirm whether the charging system is being controlled correctly or whether the vehicle has a battery monitoring or smart charging issue.
How to read the results correctly
If your engine-off voltage is healthy and your running voltage rises into the mid-13V to mid-14V range, the alternator is probably doing its job. That does not guarantee perfect current output, but it is a solid first pass.
If the voltage stays near the battery’s resting level with the engine running, there is a charging fault to investigate. That fault could be the alternator itself, the regulator, the wiring, the belt drive, or on some vehicles, the ECU control side.
If the voltage goes too high, especially above about 14.8V on a typical 12V system, stop there and investigate further. Overcharging can damage the battery and electronic components. It is not a harmless quirk.
If the voltage looks acceptable at idle but collapses with lights and blower switched on, the alternator may be weak under load. That is a common workshop scenario. The vehicle appears fine on a quick check, yet the charging system cannot support real operating demand.
Smart charging systems change the test
This is where many quick checks go wrong. Plenty of newer vehicles do not charge in a simple, constant way. The ECU may reduce alternator output to improve fuel economy, then increase it when conditions suit. That means you can sometimes see figures that would look odd on an older car but are normal for a smart charging setup.
If the vehicle has battery monitoring, stop-start, or energy management systems, use manufacturer data or live diagnostic information where possible. A simple multimeter still has value, but it should not be the only source of truth. You need to know whether the alternator is being commanded to charge and whether the battery sensor is reporting accurately.
For workshop use, that is the difference between diagnosis and guesswork. Swapping an alternator on a modern vehicle without checking the control side can waste time and money very quickly.
A quick voltage drop check
If alternator output at the unit seems fine but battery charging voltage is low, wiring resistance may be the problem. This is worth checking on older vehicles, working vans, and anything exposed to corrosion.
With the engine running and electrical load applied, measure between the alternator output terminal and the battery positive terminal. The reading should be low. A noticeable voltage drop points to resistance in the positive cable or its connections. Then check the earth side between the alternator casing and battery negative. Again, the voltage drop should be minimal. Too much resistance on either side means the alternator may be producing power that is not reaching the battery efficiently.
Common symptoms of low alternator output
Not every charging fault shows up as a no-start. Often the signs are gradual. Headlamps may dim at idle. The blower speed may vary. Warning lights can appear intermittently. Electric power steering may feel inconsistent. On commercial vehicles and high-demand systems, extra accessories can make the fault show up faster.
Battery replacement does not always cure these issues. If the alternator is undercharging, a new battery simply gives the system more reserve before the same problem returns. That is why proper testing matters.
When a basic test is not enough
A multimeter tells you voltage, but not always the full story. If you are dealing with repeated battery discharge, parasitic drain concerns, CAN-related charging faults, or irregular smart charging behaviour, step up the test process. Battery testers, scan tools with live data, and current measurement equipment give a much clearer picture.
That is particularly true for workshops working across multiple makes. The charging system is no longer just an alternator and a warning lamp. It is often part of the wider vehicle management strategy. Diagnostic Central focuses on tools built for exactly that kind of real-world fault finding – fast, accurate checks that help you confirm the cause before parts are ordered.
Safety and good practice
Do not disconnect the battery with the engine running to “test” the alternator. That old shortcut can create voltage spikes and damage control modules. Use a meter, use proper test points, and keep loose clothing and leads clear of moving belts and pulleys.
If access is poor, or if the alternator sits low in the engine bay near road spray and heat shields, take the extra minute to inspect carefully rather than forcing probes into place. Reliable readings come from controlled testing, not rushed contact on dirty terminals.
A charging system fault is usually straightforward once you test it in the right order. Start with battery voltage, check running voltage, add electrical load, and only then decide what the numbers are telling you. Done properly, it turns a vague symptom into a clear direction for repair.